

Charlieplexing is the simple technique we are talking of in this article that helps you control a considerable number of LEDs using negligible number of pins. It was first proposed in early 1995 by Charlie Allen at Maxim Integrated Products for driving a multiplexed display.
Using this method you can control n2−n LEDs using n pins on the Arduino, In other words you can control 6 LEDs using just 3 Pins.
This trick exploits the fact that LEDs are diodes and conduct electricity only in one direction.
Let’s go through this in steps, understanding it as clearly as possible.
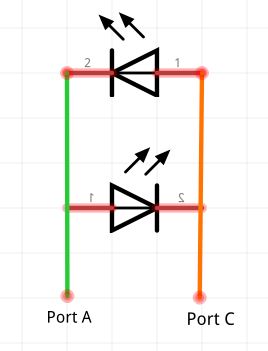
So lets say you’ve got 2 LEDs connected this way-
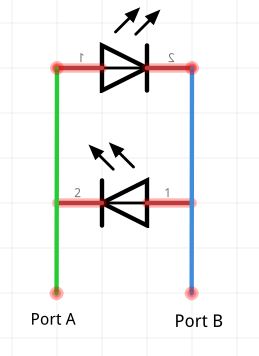
Port A and B are nothing but two digital pins on the Arduino, for instance digitalPins 3 and 4. Now, as you can see when Port A is HIGH and Port B is LOW, the upper LED lights up, while the LED below stays off (because LED’s afte all are diodes that allow current to pass only in one direction).
So this way we can control 2 LEDs.
NOW, lets introduce one more digital pin, say, Port C.
Just like what we did above, we can add two LED’s between Port C and Port B
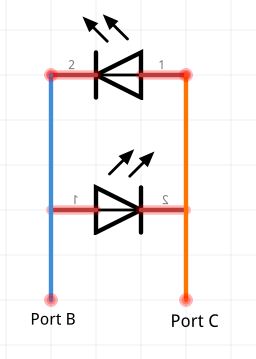
You already know how to turn on each of them.
What are we achieving by doing so?
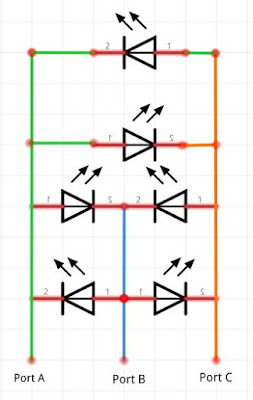
Lets connect the two pictures to get the holistic idea.
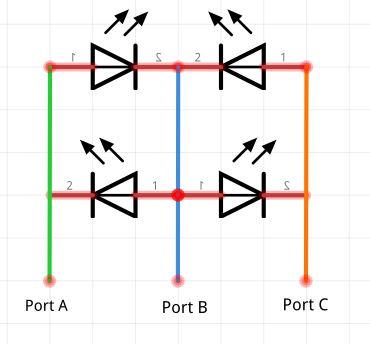
Great, we are now controlling four LEDs using 3 Pins.
Wait a second.
If we are setting one Pin HIGH and another pin LOW, the corresponding LED between them seems to light up, but what do we do with the third pin?
We set the remaining pin not in use as an input (for eg- pinMode(pin5, INPUT); ). This makes makes the pin as good as it doesn’t exist or in other words makes the pin act as an open connection hanging off the air.
Back to work, notice that we can add another two LEDs between Ports A and C?
This is it. You are now controlling 6 LEDs using just 3 pins.
That’s the basic idea of Charlieplexing.
But, how do we turn on all the LEDs together?
Simple, make each LED blink with a short delay that will be almost as good as they are constantly on.
If you’ve understood everything up to here, you can set out to build projects involving multiple LEDs with fewer ports- However, you must rememberto add current limiting resistors!
Cheers!


Leave a Reply